mischief managed (aka embroidery no. 2)

mischief managed

Another one down! A week or so ago I started an embroidery project where I embroider quotes from my favorite books. This one is also Harry Potter related because I’m still figuring this out and HP has some really great one- and two-word quotable phrases. Lucky for me.

Mischief managed is one of my favorites. The Weasley twins inspire me to focus, go after what I want, and have fun while doing it. After all, they left school with a bang and started their own business! Risk-takers, those two. I also love this quote because it signifies completion of something awesome. I’m nowhere near done with this project, but finishing this quote brought me one step closer.

Continue reading “mischief managed (aka embroidery no. 2)”

favorite quote embroidery project

So I’ve gotten into embroidery. It was only a matter of time. I have just barely dabbled in it, but I’d like to explore more. I like that it’s tedious–I get in a zone.

Since I’ve rearranged my room, I’ve been thinking of ways to make it more homey and more me. I’ll eventually get a new comforter and a rug, and I’ll add to my pictures and cards. But I wanted to add more of a handmade touch. So this weekend I looked around my craft supplies and found the perfect fabric to embroider and my only embroidery thread. I roughly cut the fabric to fit into my 6 in. embroidery hoop and then I used my fabric pen to write in my own handwriting. My goal was to pick something short and sweet, use resources I had around my house, and try embroidery to see how it went.

It went well!

always embroidery

I’d love to continue to embroider using bigger and smaller hoops to make different-sized final products. My plan is to embroider some of my favorite book quotes, then to hang them up on the wall above my dresser. Kind of like this.

Continue reading “favorite quote embroidery project”

family art project

I went home for the holidays, along with my siblings, their significant others, and their kids. My dad told us this week that we had a few projects to do before we could leave town. It would be like summer camp, he said. But for Christmas.

Christmas Camp started with family breakfasts where we learned to make southern biscuits and a book club meeting (more on that later). But one of the coolest things we did all week was a water color blob inspired art project.

art project wall

We started with a wall filled with paintings of blobs of color. My dad made them for us, he said, so that we could use ink to draw on the painting whatever image we saw in the blobs–kind of like spotting images in clouds. He had some examples.

art project sample

We each had to complete one drawing and put it back on the wall before the week ended. Well, we got a little carried away. One was just not enough. Soon we ran out of blobs and starting making more.

making more blobs

We used water colors, added some salt for texture, or used a straw to blow the paint for streaks of color–anything was fair game to get colors twisted and turned in juuuust the right way.

We had so much fun. It was so interesting to see what our family came up with, and everyone from grandkids to grandparents all participated. Here are some of my favorites. Don’t forget to sign your masterpiece!

art project water color 1


art project water color 3


art project water color 4


art project water color 5


art project water color 6


art project water color 7


art project water color 9

Here’s our wall when we were finished!

art project wall

gift-card giving fun felt envelopes

When I was little, my grandpa gave me a gift card to Barnes & Noble for $20.

I thought it was the most money in the world. I remember looking at all the shelves, picking out so many books, so excited at the new stories at my fingertips. When I was done, we went to the cash register, and–shockingly–the total was more than what the giftcard would cover. About $20 more. My generous mother said she would pay for the rest, and I bounded home with treasures from my giant shopping spree.

Gift cards are fun. They can let someone have fun and shop without budget worries. They can help you provide for someone when you aren’t sure of their size or exactly what they need. But sometimes I feel like they can be a little impersonal–it’s a great gift, but it’s hard to be excited about giving someone a piece of plastic.

So to make my gift-card giving a little more fun, I whipped up these felt envelopes. It was super fast, and I think they came out really cute!

gift card envelopes

I measure a long rectangle of 9 and 3/4 inches by 4 and 3/4 inches.

measure felt for gift card envelopes

Then I cut out the felt, and folded it into thirds. I used an iron to help me make the creases. Then I pinned it in place.

gift card envelopes folded

Then, for the top of the envelope, I measure a dot in the middle of the felt, used my ruler to make a triangle, and cut to make a point.top of gift card envelope

Then I used a zig-zag stitch–just for fun–and sewed up the sides of the envelope and to the point. I also have these cool velcro dots in my craft bookshelf, so I added those on and was done!

done_MG_0300

You could also embroider the letter of the person you are giving it too, or use a ribbon to secure the envelope instead of velcro. I just used what I had on hand. I also wasn’t very precise–you don’t have to be a perfect sewer to make these work. You could even use hot glue instead of a needle and thread. Or colored duct tape! Or any materials you have on hand! Have fun, and be proud to put it under the tree.

tree_MG_0311

Don’t forget in this season of giving that the Newtown libraries have set up a Books Heal Hearts fund to provide books and materials for their community. Like my grandpa gave the gift of books to me, you could help provide for some kids who really need some new stories or comforting entertainment. Read more in my original post on Books Heal Hearts.

that’s stationery, with an e

I just finished The Perks of Being a Wallflower. I seem to be the only person of my generation who didn’t read it in high school, and I honestly didn’t know what to expect. The only things I knew about the book were a tunnel in Pittsburgh and something about feeling infinite.

Nothing about it was what I expected, and there’s something to be said for that. I don’t think Charlie and I would be friends in real life, but I can relate to some of his doubts and struggles. Charlie makes friends, loses some, and really tries to participate in life instead of watching from the sidelines (you know, as a wallflower). Sometimes he is successful, and sometimes he’s not.

One thing Charlie definitely does well, though, is letter writing. You learn about him and his first year of high school through his letters to an anonymous acquaintance. I imagine Charlie uses whatever paper he can find, but if I were writing letters to an anonymous acquaintance for a year, I’d like to try to write on some fancy stationery.

I love the idea of having stationery lying around your house for any and all notes you choose to write throughout the year. And of course you’d write notes more often–you’d have personalized stationery ready and waiting.

But ordering stationery and having it on hand isn’t practical or easy for everyone. So I took some supplies I did have lying around the house, and added a quick, fun design to some notecards to spice up my letter writing.

diy supplies of sharpie, notecard, ruler

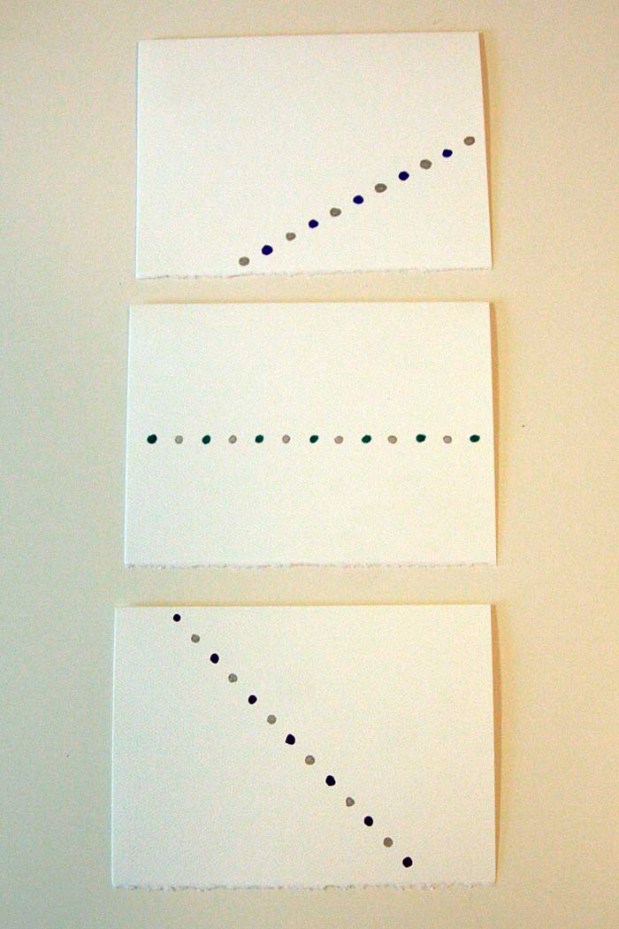
I started with a blank notecard, a ruler, and sharpies. I made a dot every half inch along the notecard with some of my favorite colors. It took just a few minutes and added a personalized touch–and you all know how much I love polka dots.

polka dot diy notecard


I kept going, adding lines willy-nilly, but you should do whatever you like! I think ombre dots would be fun, or random colors. I was worried about bleeding through, so I did have a scrap paper underneath my card as I was polka-dotting. It wasn’t a problem in this case, but might be if your notecards are thinner.

polka dot notecards


It’s super quick and super fun, and now I’m ready to write letters all over the place. Maybe I’ll start by making invitations to a Perks moving-watching party. Did you guys read this book, what did you think?


christmas dinner keepsake

I love the idea of having a dinner party, now that I have a table that can fit more than two people. And to me, name tag place holders at dinner scream “I can throw an awesome dinner party and my details are more fun than the average entire dinner.” Don’t they say that to you? 

diy name tag

I don’t have fancy Christmas plates, or lovely linen napkins. One day, I will, but in a studio apartment it was just impractical for my lifestyle. But this name tag makes me feel like I could throw a fun dinner party that I’m proud of because I put time into an extra special detail. All you need are:

  • an ornament. I used mini ornaments because I have a mini tree, but I think they would work well at any size as long as you have a glitter-free space to write on. 
  • silver sharpie
  • gold marker
  • ribbon

place settingAnd voila! You can dress up any setting with a fun name tag your guests can take home and place on their tree.

christmas ornament

You can use any color ornament, and use gold or silver to write the name and make a design. I think it would also be nice to put the date of the event on your ornament, for a keepsake. Now hurry over! I’ll make dinner as soon as I finish more name tags.

diy ornament

crafty

things I’d like to be:

  • a morning person
  • a runner
  • a good bug squisher
  • buffy-level badass
  • an excellent detective
  • someone who winters on a tropical island

things I am:

  • definitely not a morning person
  • a yoga do-er when i feel like it
  • super grossed out and scared of bugs
  • not really a night owl either
  • kind of crafty

And I guess the things I am are ok, too. And it’s the being kind of crafty that led to this project that was really fun! Remember this picture frame/jewelry holder I saw before? That was my inspiration. I just made it more me.

I started with a giant hot pink picture frame I’ve been carrying from apartment to apartment because I knew it would be good for something even though it’s pretty heavy and difficult to hang because I rent.

And then I got out the paint that I used on my wall in my old place. Yes, I carried that with me to my new apartment, too. It’s a really good color (it’s Disney’s paint called Star Command Blue in an eggshell)

My favorite part of this whole process was stirring the paint. Look how cool the purple and blue swirls are! And then it magically turned the blue I knew so well.

And I started painting. Now, I’m not the best painter, I’ll admit it. Luckily this paint is pretty thick and it only took two coats. Also, I didn’t sand or prep this frame in any way, and that most likely would have made it work a lot better. But I had limited time and no prep materials, so I made do.

I did one coat. And then another. Some tiny pink still shows few in a few places after I was done, but that gives it character, right? This was after the first coat.

And then I found my ribbons and my hot glue gun and got to gluing. And then I ran out of each color of ribbon, which is why my design is so…unique. But that gives it even more character, right? Then all that’s left to do is add my jewelry to my new jewelry display holder.

One ribbon did come down last night, so I’ll reglue it and add some reinforcements maybe in the form of a nail or tack. But I just love the final product! I’ve been putting off decorating my room because company usually doesn’t see it, but this is a really great start that makes me excited to do more.

art

I am trying to do a lot of things for my home this weekend, since I found out my office will be closed for a while and I’ll be working from home A LOT. (Sandy flooded my office, you guys. womp womp.)

I will share more apartment pictures soon so I can show you what it looks like now and the things I’d still like to do. But I have some wall space above a bookshelf where I put my TV, and I know I’d like to fill it up with a large piece of art. And I’d like to make that art, have it printed really large somewhere, and hang it up. Easy enough, right? (In theory.)

These two are my favorite designs so far, both simple, colorful, and based on books that have taken up a lot of my love and imagination. The first is based on the Dark Tower series by Stephen King. This refrain is repeated throughout the books, and the ka-tet group of friends travel through many of the worlds. The hat on the “r” is for the Gunslinger, one of the coolest men I’ve had the pleasure of reading about.

And this guy, I think you know.

I like these designs even if I don’t end up putting them on my wall, and I think I’ll play around with some more to see what else I can do.

What do you think?

hurricane what? (also, screen printing)

It’s impossible to write/think/breathe without first talking about Hurricane Sandy. I can’t stop looking at pictures of flooded streets and damaged houses, and I really hope people are getting the shelter and help they need. I am one of the few who is doing well at home, with the power on. I am very grateful, and very lucky.

Last week, before I even started thinking about hurricanes, I took this really fun class on low-tech screen printing at Brooklyn Brainery.


Obvs, I printed an ampersand. It’s a bold simple design and you know I love type (and I already made a stencil of it for another project.)

Low-tech screen printing was VERY low tech. Which is great! I can def do it at home with just a few more cheap tools. We used:

  • Mesh fabric
  • An embroidery hoop
  • Clear plastic overhead paper to make a stencil
  • Something to cut out your stencil
  • Ink

And that was it! To get started we made a design onto our sheet of plastic (there is an official name for it, but I forget what it is).

After we cut it out, we stretched our mess fabric over our embroidery hoop to make a screen. Then, we taped our stencil to the screen. Using cardboard for a squeegee, we smoothed ink over our stencil and printed our design! That’s all it takes. Super fun, and now that I have a stencil I can make all the ampersand prints I want.

I did some tests on printer paper, and then printed on a tote bag. I can’t wait to try more designs! And if I’m stuck in my house for the next few days, which it looks like I will be, I can think of a TON of designs to try. Got any suggestions?

Also, if you, too, are stuck in Brooklyn, let me know. Let’s hang out. And if you need a shower and some internet, please let me know and come on over.


countdown to moving day: 11 days

This slideshow requires JavaScript.

Pretty soon I’ll be leaving my apartment. Affordable and cute, it was the perfect place for my first apartment, and I’m quite certain I’ll never find another like it. It was exactly what I needed when I moved in two years ago–I’m sad to leave it. But I am excited for a new place and new opportunities.

I’ve been checking out catalogs and design books for new ideas on decorating. For the kitchen and living area, I think I am going to stick with the colors I have now. Which is, well, white with bright color accents. But I am really excited about the idea of merging modern design with different textures you might not associate with a modern look–like knitting and crocheting. I love the idea of making a lot of things for my new place myself, and taking the time to find some really fun, bold, pop culture-y decorations.

things I want to make

Follow my brainstorming on Pinterest and Instagram @raenudson. I can’t wait to get started! But I must because my knitting needles are packed away.