gift-card giving fun felt envelopes

When I was little, my grandpa gave me a gift card to Barnes & Noble for $20.

I thought it was the most money in the world. I remember looking at all the shelves, picking out so many books, so excited at the new stories at my fingertips. When I was done, we went to the cash register, and–shockingly–the total was more than what the giftcard would cover. About $20 more. My generous mother said she would pay for the rest, and I bounded home with treasures from my giant shopping spree.

Gift cards are fun. They can let someone have fun and shop without budget worries. They can help you provide for someone when you aren’t sure of their size or exactly what they need. But sometimes I feel like they can be a little impersonal–it’s a great gift, but it’s hard to be excited about giving someone a piece of plastic.

So to make my gift-card giving a little more fun, I whipped up these felt envelopes. It was super fast, and I think they came out really cute!

gift card envelopes

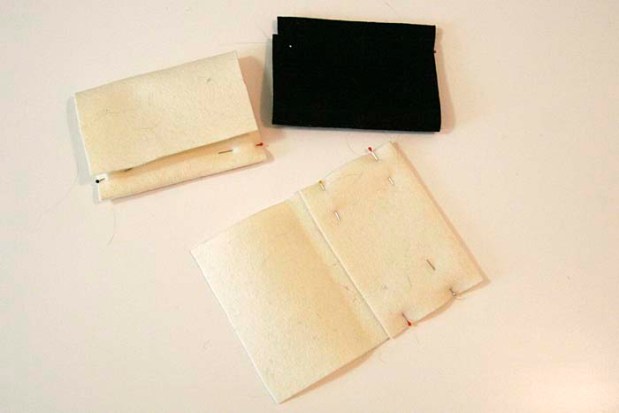
I measure a long rectangle of 9 and 3/4 inches by 4 and 3/4 inches.

measure felt for gift card envelopes

Then I cut out the felt, and folded it into thirds. I used an iron to help me make the creases. Then I pinned it in place.

gift card envelopes folded

Then, for the top of the envelope, I measure a dot in the middle of the felt, used my ruler to make a triangle, and cut to make a point.top of gift card envelope

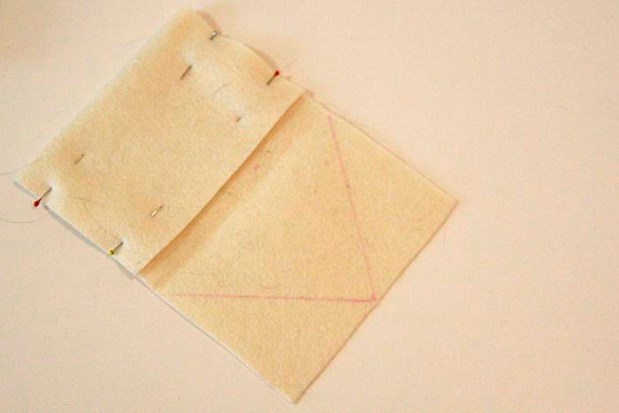
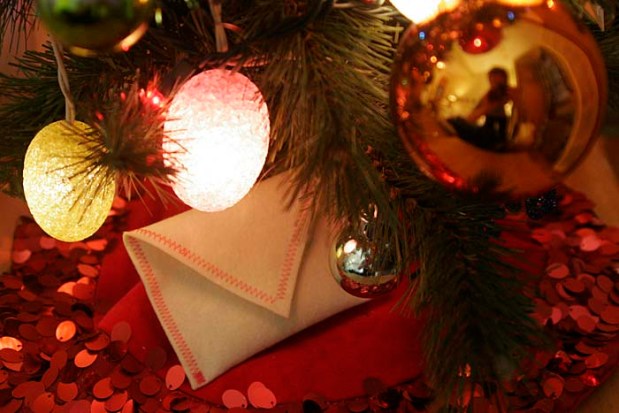
Then I used a zig-zag stitch–just for fun–and sewed up the sides of the envelope and to the point. I also have these cool velcro dots in my craft bookshelf, so I added those on and was done!

done_MG_0300

You could also embroider the letter of the person you are giving it too, or use a ribbon to secure the envelope instead of velcro. I just used what I had on hand. I also wasn’t very precise–you don’t have to be a perfect sewer to make these work. You could even use hot glue instead of a needle and thread. Or colored duct tape! Or any materials you have on hand! Have fun, and be proud to put it under the tree.

tree_MG_0311

Don’t forget in this season of giving that the Newtown libraries have set up a Books Heal Hearts fund to provide books and materials for their community. Like my grandpa gave the gift of books to me, you could help provide for some kids who really need some new stories or comforting entertainment. Read more in my original post on Books Heal Hearts.

pick-me-up

I, like the rest of the nation, need a pick-me-up. After days of off-and-on tears, and off-and-on news, knowing we can do nothing to ease the always-on pain of the families who have lost someone, I did my best this weekend to stay busy and keep my mind occupied.

So I rearranged my room. (And almost got stuck under my headboard.)

bedroom

Here it is when you walk in. To the right, you’ll see my shoes and my picture frame jewelry holder.

shoes and jewelry

And to the left, you’ll see my repurposed screens. They used to divide my old studio. Now, I think they’ll show off pictures and mail from friends. Jewels, of Oven Lovin, has a similar greeting card garland as part of her Christmas decorations.

picture screens

#fatcat enjoyed my new room.

fatcatQuite a bit.

I also recently filled the space above my tv.

living room raes days

Want to see it closer?

paintings raes days

My dad has painted on and off for many years, and he let me take home some of his paintings. And I snuck in one my mom painted, too. I’d also like to fill the spaces on the bottom left and right, but I’m not sure with what. Maybe a new painting that hasn’t been made yet.

I’ve done a lot of crafting this weekend, to keep my hands busy. I also painted my nails.

essie a cut aboveIt’s Essie’s A Cut Above. I like it because it reminds me of champagne, and I’m excited to see my friends over New Year’s.

I hope you’re excited to see your family and friends over the holidays as well. And I hope we all hug each other a little tighter.

Thinking of you, and thinking of Newtown.

that’s stationery, with an e

I just finished The Perks of Being a Wallflower. I seem to be the only person of my generation who didn’t read it in high school, and I honestly didn’t know what to expect. The only things I knew about the book were a tunnel in Pittsburgh and something about feeling infinite.

Nothing about it was what I expected, and there’s something to be said for that. I don’t think Charlie and I would be friends in real life, but I can relate to some of his doubts and struggles. Charlie makes friends, loses some, and really tries to participate in life instead of watching from the sidelines (you know, as a wallflower). Sometimes he is successful, and sometimes he’s not.

One thing Charlie definitely does well, though, is letter writing. You learn about him and his first year of high school through his letters to an anonymous acquaintance. I imagine Charlie uses whatever paper he can find, but if I were writing letters to an anonymous acquaintance for a year, I’d like to try to write on some fancy stationery.

I love the idea of having stationery lying around your house for any and all notes you choose to write throughout the year. And of course you’d write notes more often–you’d have personalized stationery ready and waiting.

But ordering stationery and having it on hand isn’t practical or easy for everyone. So I took some supplies I did have lying around the house, and added a quick, fun design to some notecards to spice up my letter writing.

diy supplies of sharpie, notecard, ruler

I started with a blank notecard, a ruler, and sharpies. I made a dot every half inch along the notecard with some of my favorite colors. It took just a few minutes and added a personalized touch–and you all know how much I love polka dots.

polka dot diy notecard


I kept going, adding lines willy-nilly, but you should do whatever you like! I think ombre dots would be fun, or random colors. I was worried about bleeding through, so I did have a scrap paper underneath my card as I was polka-dotting. It wasn’t a problem in this case, but might be if your notecards are thinner.

polka dot notecards


It’s super quick and super fun, and now I’m ready to write letters all over the place. Maybe I’ll start by making invitations to a Perks moving-watching party. Did you guys read this book, what did you think?


christmas dinner keepsake

I love the idea of having a dinner party, now that I have a table that can fit more than two people. And to me, name tag place holders at dinner scream “I can throw an awesome dinner party and my details are more fun than the average entire dinner.” Don’t they say that to you? 

diy name tag

I don’t have fancy Christmas plates, or lovely linen napkins. One day, I will, but in a studio apartment it was just impractical for my lifestyle. But this name tag makes me feel like I could throw a fun dinner party that I’m proud of because I put time into an extra special detail. All you need are:

  • an ornament. I used mini ornaments because I have a mini tree, but I think they would work well at any size as long as you have a glitter-free space to write on. 
  • silver sharpie
  • gold marker
  • ribbon

place settingAnd voila! You can dress up any setting with a fun name tag your guests can take home and place on their tree.

christmas ornament

You can use any color ornament, and use gold or silver to write the name and make a design. I think it would also be nice to put the date of the event on your ornament, for a keepsake. Now hurry over! I’ll make dinner as soon as I finish more name tags.

diy ornament

crafty

things I’d like to be:

  • a morning person
  • a runner
  • a good bug squisher
  • buffy-level badass
  • an excellent detective
  • someone who winters on a tropical island

things I am:

  • definitely not a morning person
  • a yoga do-er when i feel like it
  • super grossed out and scared of bugs
  • not really a night owl either
  • kind of crafty

And I guess the things I am are ok, too. And it’s the being kind of crafty that led to this project that was really fun! Remember this picture frame/jewelry holder I saw before? That was my inspiration. I just made it more me.

I started with a giant hot pink picture frame I’ve been carrying from apartment to apartment because I knew it would be good for something even though it’s pretty heavy and difficult to hang because I rent.

And then I got out the paint that I used on my wall in my old place. Yes, I carried that with me to my new apartment, too. It’s a really good color (it’s Disney’s paint called Star Command Blue in an eggshell)

My favorite part of this whole process was stirring the paint. Look how cool the purple and blue swirls are! And then it magically turned the blue I knew so well.

And I started painting. Now, I’m not the best painter, I’ll admit it. Luckily this paint is pretty thick and it only took two coats. Also, I didn’t sand or prep this frame in any way, and that most likely would have made it work a lot better. But I had limited time and no prep materials, so I made do.

I did one coat. And then another. Some tiny pink still shows few in a few places after I was done, but that gives it character, right? This was after the first coat.

And then I found my ribbons and my hot glue gun and got to gluing. And then I ran out of each color of ribbon, which is why my design is so…unique. But that gives it even more character, right? Then all that’s left to do is add my jewelry to my new jewelry display holder.

One ribbon did come down last night, so I’ll reglue it and add some reinforcements maybe in the form of a nail or tack. But I just love the final product! I’ve been putting off decorating my room because company usually doesn’t see it, but this is a really great start that makes me excited to do more.

hurricane what? (also, screen printing)

It’s impossible to write/think/breathe without first talking about Hurricane Sandy. I can’t stop looking at pictures of flooded streets and damaged houses, and I really hope people are getting the shelter and help they need. I am one of the few who is doing well at home, with the power on. I am very grateful, and very lucky.

Last week, before I even started thinking about hurricanes, I took this really fun class on low-tech screen printing at Brooklyn Brainery.


Obvs, I printed an ampersand. It’s a bold simple design and you know I love type (and I already made a stencil of it for another project.)

Low-tech screen printing was VERY low tech. Which is great! I can def do it at home with just a few more cheap tools. We used:

  • Mesh fabric
  • An embroidery hoop
  • Clear plastic overhead paper to make a stencil
  • Something to cut out your stencil
  • Ink

And that was it! To get started we made a design onto our sheet of plastic (there is an official name for it, but I forget what it is).

After we cut it out, we stretched our mess fabric over our embroidery hoop to make a screen. Then, we taped our stencil to the screen. Using cardboard for a squeegee, we smoothed ink over our stencil and printed our design! That’s all it takes. Super fun, and now that I have a stencil I can make all the ampersand prints I want.

I did some tests on printer paper, and then printed on a tote bag. I can’t wait to try more designs! And if I’m stuck in my house for the next few days, which it looks like I will be, I can think of a TON of designs to try. Got any suggestions?

Also, if you, too, are stuck in Brooklyn, let me know. Let’s hang out. And if you need a shower and some internet, please let me know and come on over.